Keeping your air hose in good shape is key to its long life and performance. Knowing how to remove the spring is a big part of this. It might seem hard, but with the right tools and steps, it’s easy. Regular maintenance is vital to avoid damage and keep things running well.
This article will show you how to take off the spring from your air hose. You’ll learn how to do repairs or maintenance easily. Knowing how to maintain your air hose is important for keeping it in great condition.
Learning to remove the spring from an air hose is useful for anyone who uses them often. With the right help, you can easily maintain your air hose equipment. We’ll guide you through the steps to remove the spring, so you can do it confidently.
Understanding Air Hose Springs and Their Purpose
Air hose springs are key to air hoses, playing a big role in how they work. Knowing how to take care of them is important. The spring keeps the hose’s shape, stopping it from kinking or getting damaged. When you think about spring removal techniques, it’s key to know why the spring is there.
The main job of an air hose spring is to add flexibility and support. This makes airflow smooth and keeps the hose safe. Air hose springs can handle many different conditions, making them a trusted part of air hoses. But sometimes, you might need to remove the spring, like if the hose is broken or needs a new one.
- Regular care to stop damage and keep airflow smooth
- Knowing the spring’s benefits and purpose to know when to take it out
- Using the right spring removal techniques to not harm the hose
Understanding air hose springs and their role helps make smart choices about upkeep and fixes. This knowledge is vital for keeping air hoses working well, which is important in many industries.
Essential Safety Precautions Before Starting
Working with air hoses requires air hose safety to be top priority. Before you start, make sure you’re in a safe place. Wear gloves and safety glasses to protect yourself from flying debris or sharp edges.
Here are some safety precautions to keep in mind:
- Make sure the air hose is tied down to avoid unexpected movement
- Keep the area clear of obstacles to avoid tripping
- Work in a well-ventilated area to avoid gas buildup
By following these air hose safety tips, you can avoid injuries and do the job right. Remember, safety precautions are key to avoiding accidents and keeping the work flowing smoothly.
Always put air hose safety first and take the right safety precautions. This will keep you and others safe, making your work environment better and more efficient.
Required Tools and Materials
For air hose repair, the right tools and materials are key. First, know what required tools you need. This includes basic tools for removing the spring from your air hose.
A list of basic tools needed includes:
- Pliers
- Wrenches
- Screwdrivers
- Socket set
These tools help you grip, twist, and loosen the spring. A clean, organized workspace is also important for a smooth air hose repair process.
Optional tools like a spring compressor can be helpful. But, the basic tools listed above are usually enough for most air hose repair jobs. Knowing what required tools you need prepares you for a successful air hose repair process.

Also, consider your workspace. A clean, dry, and well-lit area makes work safer and more efficient. By following these tips and using the right tools, you’ll do a great air hose repair job.
| Tool | Description |
|---|---|
| Pliers | Used to grip and twist the spring |
| Wrenches | Used to loosen and remove the spring |
| Screwdrivers | Used to remove any screws or clips |
Preparing Your Air Hose for Spring Removal
DIY air hose projects need proper preparation for spring removal. Clean the air hose well to remove dirt or debris. This helps the spring come out smoothly.
It’s important to check the air hose for damage or wear. Look for cracks, cuts, or abrasions. These can harm the hose’s performance.
To get your air hose ready, follow these steps:
- Disconnect the air hose from the compressor or other equipment
- Drain any remaining air from the hose
- Inspect the hose for any damage or debris
- Clean the hose with a soft brush or cloth
By doing these steps, your air hose will be ready for spring removal. This makes the process safer and easier. Always prepare your air hose well for DIY projects.
With a well-prepared air hose, you can focus on spring removal. Your hose will be in good shape. This makes your DIY projects more efficient and successful.
How to Take the Spring off an Air Hose: Step-by-Step Process
Removing the spring from an air hose might seem hard, but it’s doable with the right steps. Keeping your air hose in good shape is key for its long life and performance. We’ll show you how to remove the spring safely and effectively.
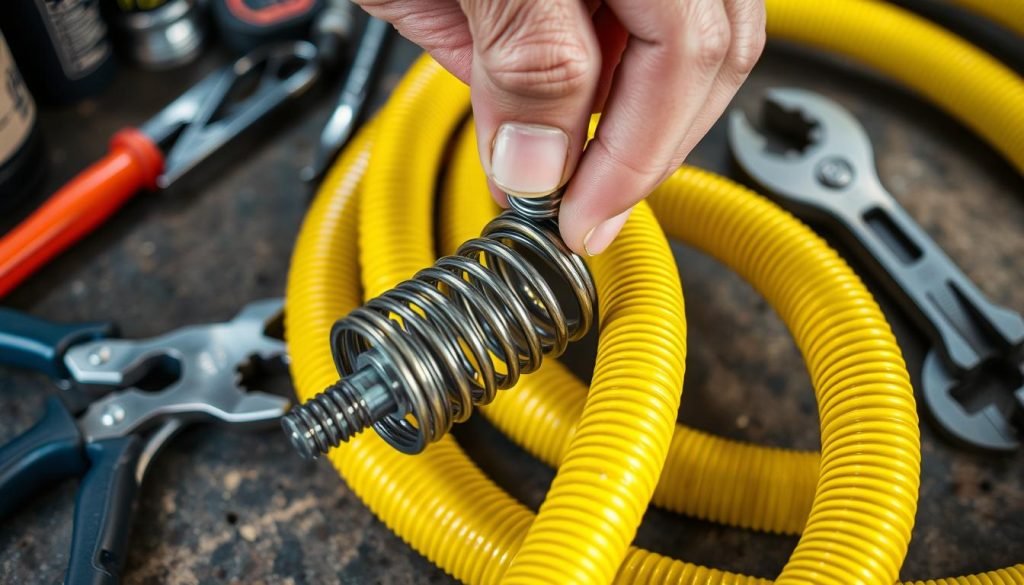
Securing the Hose
First, make sure the hose is steady to avoid any movement. You can clamp it to a solid surface or use a hose clamp to keep it in place.
Spring Removal Technique
With the hose secure, you can start removing the spring. Use a spring removal tool to gently take it off the hose. Always follow the right steps to avoid harming the hose or spring.
Dealing with Stubborn Springs
Some springs can be hard to remove. If that’s the case, use a mix of patience and spring removal techniques to slowly unwind it. Always keep in mind the importance of proper air hose maintenance for the hose’s longevity.
| Spring Removal Tools | Description |
|---|---|
| Spring Removal Tool | Used to unwind the spring from the hose |
| Hose Clamp | Used to secure the hose during the removal process |
Common Challenges and Solutions During Spring Removal
Removing the spring from an air hose can be tricky. You might face air hose repair or need more maintenance. Rust is a big problem, making the spring hard to take out. To fix this, use a rust-inhibiting lubricant and wait a few minutes before trying to remove the spring.
Removing stubborn springs can be frustrating and take a lot of time. A spring removal tool can help a lot. If the spring gets damaged, you might need to replace it to keep the air hose working right.

- Rust and corrosion
- Stubborn or damaged springs
- Damaged air hoses requiring air hose repair
To tackle thesecommon challenges, having the right tools and knowledge is key. This ensures a smooth spring removal process.
Knowing the challenges and having solutions helps. It makes spring removal easier and faster. This way, you can avoid air hose repair and reduce downtime.
| Challenge | Solution |
|---|---|
| Rust and corrosion | Apply rust-inhibiting lubricant |
| Stubborn springs | Use a spring removal tool |
| Damaged air hoses | Replace the damaged section or perform air hose repair |
Post-Removal Care and Maintenance
After removing the spring from your air hose, it’s key to take good care of it. This is vital for DIY projects, as it affects the hose’s performance. Proper care ensures your air hose lasts longer and works better.
Start by regularly checking the hose for damage. Look for cracks, cuts, or any wear. Also, store the hose right to avoid damage. Here are some tips for storing it:
- Keep the hose in a dry, cool spot, away from sunlight.
- Don’t coil or bend the hose, as it can get damaged.
- Use a hose reel or container to organize and protect it.
By inspecting and storing your hose correctly, you can make it last longer. This means you won’t need to replace it as often. These easy steps will help your air hose work well, making your DIY projects successful.
Remember, taking care of your air hose after use is important. By inspecting and storing it right, you’ll have a hose that lasts longer and works better. This is great for all your DIY projects.
Safety Tips for Using Springless Air Hoses
Working with springless air hoses requires a focus on air hose safety. This is to avoid accidents and keep the work area safe. It’s important to handle, store, and maintain these hoses properly. Here are some key safety tips:
Always check the springless air hoses before you start using them. Look for any damage or wear. This includes cracks, cuts, or abrasions on the hose. Also, make sure all connections are tight. Regular checks can spot problems early.
Here are more safety tips for springless air hoses:
- Keep the hoses in a dry, cool spot, away from sunlight and moisture.
- Don’t stretch or bend the hoses too much. This can damage them and shorten their life.
- Use the right size and type of springless air hoses for your job. This ensures safe and efficient use.
By following these air hose safety tips, you can prevent accidents. This makes working with springless air hoses safer. Always handle the hoses carefully and never use them in a way that could harm you or others.
Conclusion
As we wrap up our guide on taking the spring off an air hose, let’s review what you’ve learned. You now know how to remove the spring from your air hose. This skill is key for any air hose repair or maintenance.
Doing DIY air hose projects can save you time and money. It also keeps your air hose system running well. With the right tools and a clean workspace, you can do this job easily and confidently.
If you want to learn more about DIY air hose projects, check out our recommended resources. Learning and practicing these skills will make you an expert in air hose maintenance.